This program shows how to blink a led by switching the pushbutton and check for debounce.
MSP-EXP430G2 LaunchPad
Pushbutton [available already on-board as part of the LaunchPad]
LED [available already on-board as a part of the Launchpad]
Momentary button or switch
10K ohm resistor
Breadboard
Hook-up wire
This example demonstrates the use of a pushbutton as a switch: each time you press the button, the LED (or whatever) is turned on (if it’s off) or off (if on). It also debounces the input, which means checking twice in a short period of time to make sure it’s definitely pressed. Without debouncing, pressing the button once can appear to the code as multiple presses. millis() function is used to keep track of the time when the button is pressed.

Image developed using Fritzing. For more circuit examples, see the Fritzing project page.
For on-board push button
No external circuitry is required.
For external push button
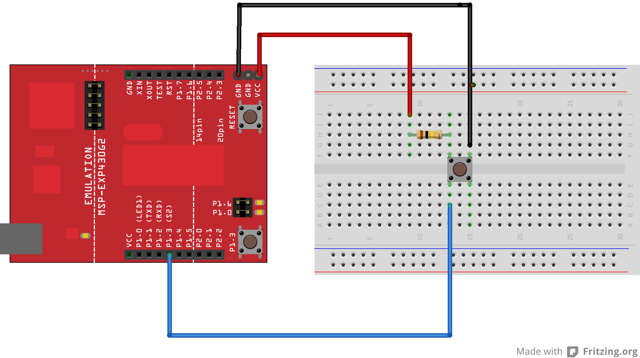
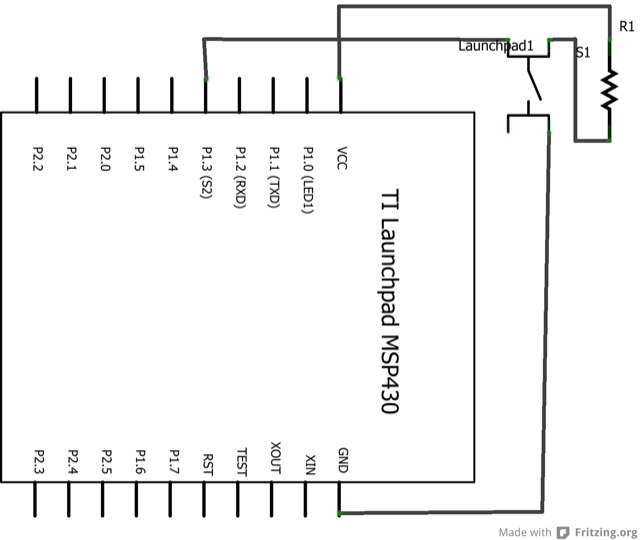
Connect three wires to the Launch pad board. The first two, red and black, connect to the two long vertical rows on the side of the breadboard to provide access to the 3 volt supply and ground. The third wire goes from digital pin p1.3 to one leg of the pushbutton. That same leg of the button connects through a pull-up resistor (here 10 K Ohms) to Vcc. The other leg of the button connects to the ground.

In the program, pin 14, which has green LED connected to it, is set up as output in the setup function.
pinMode(ledPin, OUTPUT);
Here the ledpin refers to the GREEN_LED which is set as output. The push button which is connected to pin 5 is set up as input. The pull-up resistor connected to this pin is enabled.
pinMode(buttonPin, INPUT_PULLUP);
In the main loop, the state of the pushbutton is saved in the variable ''reading''.
int reading = digitalRead(buttonPin);
If the state of the pushbutton has changed from its previous stored state, then the time at which it was pressed is obtained with the help of millis( ) and saved.
if (reading != lastButtonState) {
    lastDebounceTime = millis();
}
If the buttonState didn’t change for a time equal to debounce delay, then it means that it is the actual current stable state of the push button and this is reflected accordingly in the output pin connected to LED as well.
if ((millis( ) - lastDebounceTime) > debounceDelay) {
    buttonState = reading;
}
digitalWrite(ledPin, buttonState);
/*
  created 21 November 2006
  by David A. Mellis
  modified 30 Aug 2011
  by Limor Fried
  modified 27 Apr 2012
  Robert Wessels
  This example code is in the public domain.
*/

// set pin numbers:
const int buttonPin = PUSH2;     // the number of the pushbutton pin
const int ledPin =  GREEN_LED;      // the number of the LED pin

// Variables will change:
int ledState = HIGH;         // the current state of the output pin
int buttonState;             // the current reading from the input pin
int lastButtonState = LOW;   // the previous reading from the input pin

// the following variables are long's because the time, measured in miliseconds,
// will quickly become a bigger number than can be stored in an int.
long lastDebounceTime = 0;  // the last time the output pin was toggled
long debounceDelay = 50;    // the debounce time; increase if the output flickers

void setup() {
  pinMode(buttonPin, INPUT_PULLUP);
  pinMode(ledPin, OUTPUT);
}

void loop() {
  // read the state of the switch into a local variable:
  int reading = digitalRead(buttonPin);

  // check to see if you just pressed the button
  // (i.e. the input went from LOW to HIGH),  and you've waited
  // long enough since the last press to ignore any noise:

  // If the switch changed, due to noise or pressing:
  if (reading != lastButtonState) {
    // reset the debouncing timer
    lastDebounceTime = millis();
  }

  if ((millis( ) - lastDebounceTime) > debounceDelay) {
    // whatever the reading is at, it's been there for longer
    // than the debounce delay, so take it as the actual current state:
    buttonState = reading;
  }

  // set the LED using the state of the button:
  digitalWrite(ledPin, buttonState);

  // save the reading.  Next time through the loop,
  // it'll be the lastButtonState:
  lastButtonState = reading;
}
Use the button to print something in binary to the serial monitor.
BareMinimum:the bare minimum of code needed to start an Energia sketch.
Blink:turn an LED on and off.
DigitalReadSerial:read a switch, print the state out to the Energia Serial Monitor.
Button State Change:counting the number of button pushes.