
This example demonstrates string-based communication from the MSP430LaunchPad to the computer using a call-and-response (handshaking) method. The sketch sends an ASCII string on startup and repeats that until it gets a serial response from the computer. Then it sends three sensor values as ASCII-encoded numbers, separated by commas and terminated by a linefeed and carriage return, and waits for another response from the computer.
You can use the Energia serial monitor to view the sent data, or it can be read by Processing (see code below). The example below splits the incoming string on the commas and convert the string into numbers again.
Compare this to the Serial call and response. They are similar, in that both use a handshaking method, but this one encodes the sensor readings as strings, while the other sends them as binary values. While sending as ASCII-encoded strings takes more bytes, it means you can easily send values larger than 255 for each sensor reading. It’s also easier to read in a serial terminal program.
MSP-EXP430G2 LaunchPad
Two potentiometers
Momentary switch/button
Three 10K ohm resistors
Breadboard
Hook-up wire
In this code, we use the function Serial.print(). This function writes the value of what is in the function as readable ASCII text. For instance if we put Serial.write(100); into Energia sketch, when we open the Serial monitor, we will see a string of "100" written on the Serial Monitor. We can also write words to the Serial Monitor using Serial.print(). For instance Serial.print("Hello"); will return "Hello" on the Serial Monitor. With Serial.print() you can also change the base you want to read the value in the function. For example, Serial.print(78, BIN) will show "1001110" on the Serial Monitor.
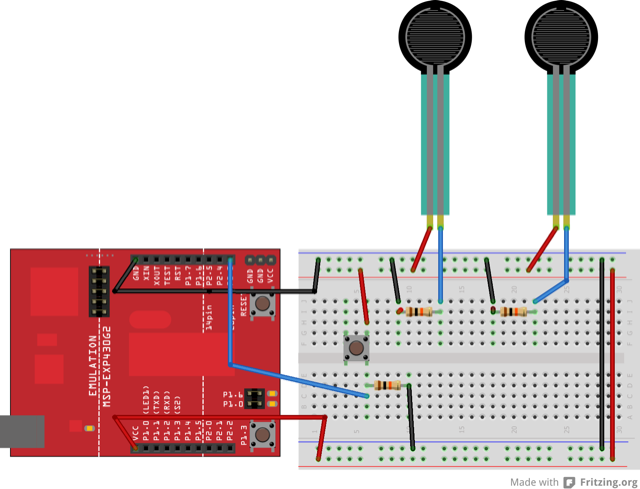
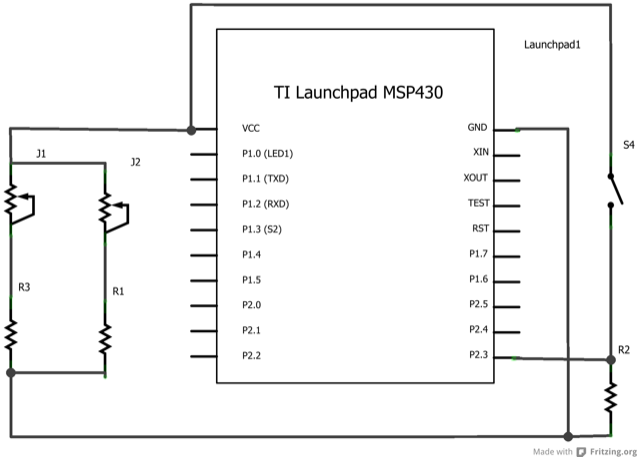
Connect analog sensors to analog input pin 0 and 1 with 10K ohm resistors used as voltage dividers. Connect a pushbutton or switch to digital I/O pin 2 with a 10Kohm resistor as a reference to ground.
Energia
This code is very similar to the Serial Call and Response example. The main difference is we read the sensor values from the LaunchPad as ASCII-encoded-numbers instead of binary values as was the case from the previous Serial Call and Response which make them easier to read in the Serial Monitor.
Processing
The Processing code is also similar to the Serial Call and Response example in which you change the position of the circle produced by Processing by changing the sensors connected to the LaunchPad.
/*
  Serial Call and Response in ASCII

  This program sends an ASCII A (byte of value 65) on startup
  and repeats that until it gets some data in.
  Then it waits for a byte in the serial port, and
  sends three ASCII-encoded, comma-separated sensor values,
  truncated by a linefeed and carriage return,
  whenever it gets a byte in.

  Thanks to Greg Shakar and Scott Fitzgerald for the improvements

  The circuit:
  * potentiometers attached to analog inputs 0 and 1
  * pushbutton attached to digital I/O 2


  Created 26 Sept. 2005
  by Tom Igoe
  modified 24 Apr 2012
  by Tom Igoe and Scott Fitzgerald
  modified 24 Apr 2013
  By Sean Alvarado

  Hardware Required:
  * MSP-EXP430G2 LaunchPad
  * (2) potentiometers
  * momentary switch/button
  * (3) 10K ohm resistors
  * breadboard
  * hook-up wire

  This example code is in the public domain.

*/

int firstSensor = 0; // first analog sensor
int secondSensor = 0; // second analog sensor
int thirdSensor = 0; // digital sensor
int inByte = 0; // incoming serial byte

void setup()
{
  // start serial port at 9600 bps and wait for port to open:
  Serial.begin(9600);

  pinMode(2, INPUT); // digital sensor is on digital pin 2
  establishContact(); // send a byte to establish contact until receiver responds
}

void loop()
{
  // if we get a valid byte, read analog ins:
  if (Serial.available() > 0) {
    // get incoming byte:
    inByte = Serial.read();
    // read first analog input:
    firstSensor = analogRead(A0);
    // read second analog input:
    secondSensor = analogRead(A1);
    // read switch, map it to 0 or 255L
    thirdSensor = map(digitalRead(2), 0, 1, 0, 255);
    // send sensor values:
    Serial.print(firstSensor);
    Serial.print(",");
    Serial.print(secondSensor);
    Serial.print(",");
    Serial.println(thirdSensor);
  }
}

void establishContact() {
  while (Serial.available() <= 0) {
    Serial.println("0,0,0"); // send an initial string
    delay(300);
  }
}

/*
// Processing code to run with this example:

// This example code is in the public domain.

import processing.serial.*; // import the Processing serial library
Serial myPort; // The serial port

float bgcolor; // Background color
float fgcolor; // Fill color
float xpos, ypos; // Starting position of the ball

void setup() {
  size(640,480);

  // List all the available serial ports
  println(Serial.list());

  // Change the 0 to the appropriate number of the serial port
  // that your LaunchPad is connected to.
  myPort = new Serial(this, Serial.list()[0], 9600);

  // read bytes into a buffer until you get a linefeed (ASCII 10):
  myPort.bufferUntil('\n');

  // draw with smooth edges:
  smooth();
}

void draw() {
  background(bgcolor);
  fill(fgcolor);
  // Draw the shape
  ellipse(xpos, ypos, 20, 20);
}

// serialEvent method is run automatically by the Processing applet
// whenever the buffer reaches the byte value set in the bufferUntil()
// method in the setup():

void serialEvent(Serial myPort) {
  // read the serial buffer:
  String myString = myPort.readStringUntil('\n');
  // if you got any bytes other than the linefeed:
  myString = trim(myString);

  // split the string at the commas
  // and convert the sections into integers:
  int sensors[] = int(split(myString, ','));

  // print out the values you got:
  for (int sensorNum = 0; sensorNum < sensors.length; sensorNum++) {
    print("Sensor " + sensorNum + ": " + sensors[sensorNum] + "\t");
  }
  // add a linefeed after all the sensor values are printed:
  println();
  if (sensors.length > 1) {
    xpos = map(sensors[0], 0,1023,0,width);
    ypos = map(sensors[1], 0,1023,0,height);
    fgcolor = sensors[2];
  }
  // send a byte to ask for more data:
  myPort.write("A");
}

*/
Dimmer:move the mouse to change the brightness of an LED.
Graph:send data to the computer and graph it in Processing.
Physical Pixel:turn an LED on and off by sending data from Processing.
Virtual Color Mixer:send multiple variables from an LaunchPad to the computer and read them in Processing.
Serial Call Response:send multiple variables using a call and response (handshaking) method.
Serial Call and Response ASCII:send multiple vairables using a call-and-response (handshaking) method, and ASCII-encoding the values before sending.
Serial Input (Switch (case) Statement):how to take different actions based on characters received by the serial port.
Corrections, suggestions, and new documentation are very welcomed. They can be contributed to the energia website repository on Github.
The text of the Energia getting started and reference guides are licensed under a Creative Commons Attribution-ShareAlike 3.0 License. The Energia reference is based on the Wiring/Arduino reference. Code samples in the guide are released into the public domain.
Energia sketches are C/C++ based and compiled with the open-source compiler MSPGCC or arm-gcc-none-eabi. The Energia language comes from Wiring. The Energia environment is based on Processing and includes modifications made by Wiring and Arduino.
© Energia