
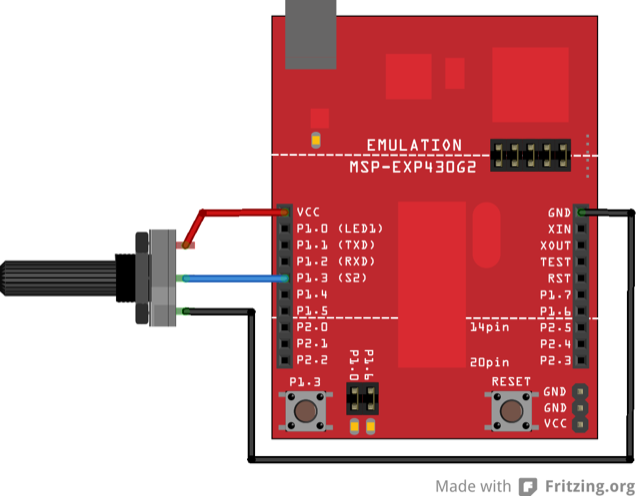
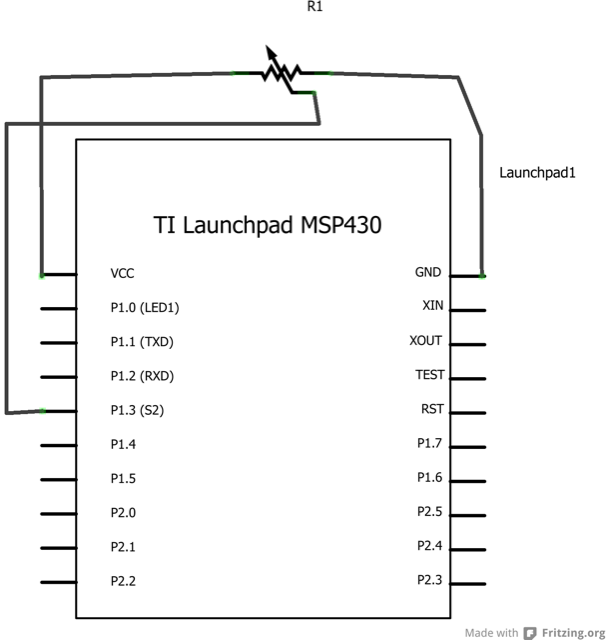
This example shows you how to read analog input from the physical world using a potentiometer. A potentiometer is a simple mechanical device that provides a varying amount of resistance when its shaft is turned. By passing voltage through a potentiometer and into an analog input on your LaunchPad, it is possible to measure the amount of resistance produced by a potentiometer (or pot for short) as an analog value. In this example you will monitor the state of your potentiometer after establishing serial communication between your LaunchPad and your computer.
MSP-EXP430G2 LaunchPad
10-kilohm Potentiometer
Hook-up wire
By turning the shaft of the potentiometer, you change the amount of resistance on either side of the wiper which is connected to the center pin of the potentiometer. This changes the voltage at the center pin. When the resistance between the center and the side connected to ~3 volts is close to zero (and the resistance on the other side is close to 10 kilohms), the voltage at the center pin nears 3 volts. When the resistances are reversed, the voltage at the center pin nears 0 volts, or ground. This voltage is the analog voltage that you’re reading as an input.
The LaunchPad has a circuit inside called an analog-to-digital converter that reads this changing voltage and converts it to a number between 0 and 1023. When the shaft is turned all the way in one direction, there are 0 volts going to the pin, and the input value is 0. When the shaft is turned all the way in the opposite direction, there are 3 volts going to the pin and the input value is 1023. In between, analogRead() returns a number between 0 and 1023 that is proportional to the amount of voltage being applied to the pin.
By turning the shaft of the potentiometer, you change the amount of resistance on either side of the wiper which is connected to the center pin of the potentiometer. This changes the voltage at the center pin. When the resistance between the center and the side connected to 3 volts is close to zero (and the resistance on the other side is close to 10 kilohms), the voltage at the center pin nears 3 volts. When the resistances are reversed, the voltage at the center pin nears 0 volts, or ground. This voltage is the analog voltage that you’re reading as an input.
The LaunchPad has a circuit inside called an analog-to-digital converter that reads this changing voltage and converts it to a number between 0 and 1023. When the shaft is turned all the way in one direction, there are 0 volts going to the pin, and the input value is 0. When the shaft is turned all the way in the opposite direction, there are 3 volts going to the pin and the input value is 1023. In between, analogRead() returns a number between 0 and 1023 that is proportional to the amount of voltage being applied to the pin.
In the program below, the only thing that you do will in the setup function is to begin serial communications, at 9600 bits of data per second, between your LaunchPad and your computer with the command:
Serial.begin(9600);
Next, in the main loop of your code, you need to establish a variable to store the resistance value (which will be between 0 and 1023, perfect for an int datatype) coming in from your potentiometer connected to Analog Pin 3:
int sensorValue = analogRead(A3);
Finally, you need to print this information to your serial window as a decimal (DEC) value. You can do this with the command Serial.println() in your last line of code:
Serial.println(sensorValue, DEC)
Now, when you open your Serial Monitor in the Energia development environment (by clicking the button directly to the right of the ''Upload'' button in the header of the program), you should see a steady stream of numbers ranging from 0-1023, correlating to the position of the pot. As you turn your potentiometer, these numbers will respond almost instantly.
/*
  AnalogReadSerial
  Reads an analog input on pin A3, prints the result to the serial monitor.
  Attach the center pin of a potentiometer to pin A3, and the outside pins to ~3V and ground.

  This example code is in the public domain.
*/

// the setup routine runs once when you press reset:
void setup() {
  // initialize serial communication at 9600 bits per second:
  Serial.begin(9600);
}

// the loop routine runs over and over again forever:
void loop() {
  // read the input on analog pin A3:
  int sensorValue = analogRead(A3);
  // print out the value you read:
  Serial.println(sensorValue);
  delay(1); // delay in between reads for stability
}
Read all the analog pins and verify they behave properly.
BareMinimum:the bare minimum of code needed to start an Energia sketch.
Blink:turn an LED on and off.
DigitalReadSerial:read a switch, print the state out to the Energia Serial Monitor.
AnalogReadSerial:read a potentiometer, print it’s state out to the Energia Serial Monitor.
Fade:demonstrates the use of analog output to fade an LED.
ReadAnalogVoltage:reads an analog input and prints the voltage to the serial monitor.
Corrections, suggestions, and new documentation are very welcomed. They can be contributed to the energia website repository on Github.
The text of the Energia getting started and reference guides are licensed under a Creative Commons Attribution-ShareAlike 3.0 License. The Energia reference is based on the Wiring/Arduino reference. Code samples in the guide are released into the public domain.
Energia sketches are C/C++ based and compiled with the open-source compiler MSPGCC or arm-gcc-none-eabi. The Energia language comes from Wiring. The Energia environment is based on Processing and includes modifications made by Wiring and Arduino.
© Energia